Showing posts with label broccoli. Show all posts

Thursday, July 10, 2008

Marinate After You Cook?


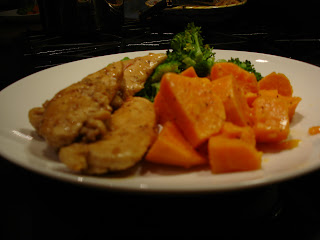
I cook chicken a whole lot but really it is so versatile it is hard to get sick of. I had defrosted some breast tenders and decided to look for a new way to cook them in How to Cook Everything by Mark Bittman.

I found a recipe that you can grill or broil chicken cutlets but the thing that caught my eye is that you marinate the chicken after cooking so I decided to try it.

I set the broiler to Hi then rinse and pat dry my chicken tenders (about 1 to 1 1/2 pounds or equivalent of two breasts). I rub the tenders with 1 tablespoon of vegetable or peanut oil and the cut side of a 1 clove of garlic then season them with salt and pepper. I place them on a cookie sheet and place on the top rack of the broiler and grill for 2-3 minutes per side. (If you have thicker pieces I would broil for 3-4 min per side. I hate dry chicken so I prefer to cook it for less time as I know it will continue to cook in the post-marinade.)

While the chicken is broiling I assemble the marinade. In a saucepan, I place the following ingredients: 1/2 cup of rice vinegar; 1 tablespoon honey; 1 tablespoon of water; 2 tablespoons of soy sauce; 1 tablespoon peeled and minced ginger (I was out and substituted just a mere teaspoon of dry); and 1 tablespoon of prepared horseradish. I simmer the ingredients over medium-low heat for about two minutes. When the chicken is cooked, I place it on a serving platter and cover it with the marinade. Then I let this sit there while I prepare the rest of the meal. You can serve right away if you prefer.

My side dishes will be boiled sweet potatoes and steamed broccoli. I prefer to keep things simple with the vegetables to not add extra calories or prep time. I simply peel and cut three medium-sized sweet potatoes, cover with water and boil until a fork can easily pierce a chunk or two. I then toss with a bit of butter and salt and pepper but this is optional. For the broccoli, I simply place about two cups of cut up broccoli into a steamer and steam until just soft. I strongly dislike mushy broccoli so I really keep an eye on it and drain the water immediately to stop it from cooking.

While the vegetables are cooking, I periodically move the chicken around in the marinade to coat it evenly. When the vegetables are cooked I simply serve them with the chicken at room temperature.

Thursday, May 29, 2008

Goat Cheese Souffle & Tomato Soup

Souffle is really my idea of a glorified omelet. It takes a few extra steps but it is really worth the effort for a simple tasty meal. I found a recipe online for this souffle a few weeks ago and decided to finally try it on Saturday night.

What appealed to me about the recipe is that I almost always have broccoli and goat cheese handy. I set my oven to 375 degrees and prepared my souffle dish. The recipe called for just coating it with a cooking spray but I have had more success in the past with oiling and flouring the dish. You just put a scant tablespoon of oil or butter in the dish and use a paper towel to coat the pan - taking care to get the corners. Then take a bit of flour (about 2 tablespoons) and carefully move the dish around to get the flour to coat all the surfaces; gently tap out any excess. Set this aside so it is ready to be filled with the batter and placed in the oven.

Next I washed and set up my broccoli (approximately 1 1/2 cups) to steam. I didn't chop it just yet as I want my florets to stay intact while they steam. I will chop them just before I add them to the batter. (The recipe calls for you to steam the broccoli in the microwave the only reason that I don't do this is personal preference. I almost never use my microwave except to melt butter and heat up leftovers.)

Next I set up my ingredients for the cheese sauce base. It is a good idea to have everything measured and set up since a cheese sauce requires immediate action on each step. My biggest problem with putting together a cheese sauce is that it almost never fails that Luis wants my attention suddenly when I am cooking one. I hate telling someone to hold that thought but dinner is at stake so sometimes you just have to. I add 1 tablespoon of butter and 1 tablespoon of olive oil to my saucepan. Then I measure out 2 tablespoons of all-purpose flour; 1 1/4 cup of milk (I use skim milk because that is the only kind that I buy); and in a third small dish I measure out 1 teaspoon of Dijon mustard, 1/4 teaspoon of salt, 1/4 teaspoon rosemary (in this case I used fresh rosemary so about 1/2 tsp).

Before I start the sauce, I carefully crumble my 1/2 cup of goat cheese (you can substitute any type of cheese but goat cheese and rosemary compliment each other well). I also set up my eggs; I take five large eggs and carefully separate the yolks and egg whites. I will need all five of the egg whites but only three of the yolks for this recipe. (I put the two extra yolks in the fridge in case I find some use for them in the next day or so.)

Finally, with everything set up, I am ready to get the show started. My final check is to determine when our dinner guest is arriving because souffle needs to be served immediately. It is one of those dishes that looks amazing coming out of the oven and then quickly deflates. I turn the burner under the butter and oil to medium-high heat. When it starts to sizzle, I add the flour and quickly whisk it in for about a minute. I don't want it to get too dark but I do want it to lightly brown. Then I add the milk and whisk it quickly to prevent lumps and finally add the mustard, salt and rosemary. I let this cook - whisking constantly - until the sauce begins to thicken. The consistency should be somewhat creamy - the idea being if you were to pour this over pasta it would coat the pasta nicely; it would be neither watery nor gloppy.

Turn off the burner and remove the pan from the stove top. Immediately add the goat cheese and three eggs yolks and whisk them in until the cheese is melted. Transfer this mixture to a large bowl as you will be adding the eggs whites in the final step.

Now your egg whites should be started with an electric hand mixer; set the mixer in the bowl and turn on the high. Whisk the eggs whites until they start to form soft peaks. Turn off the mixer and add a 1/4 teaspoon of cream of tartar. (Cream of Tartar is optional but it helps give your whites a bit of an advantage; it helps stabilize the egg whites and give a bit more volume when whisking them.) Now continue whisking the whites until the peaks of egg whites are very stiff. Using a spatula, gently add about half the whites to the cheese sauce and fold in. Next add the broccoli and the remaining egg whites and continue folding in the mixture until there are no more foamy white streaks. Pour this mixture into the prepared souffle dish and put it into the pre-heated oven. Cook for about 30 minutes (if using individual ramekins cook for about 20 minutes). When cooked it should looked very puffed and have a nicely browned crown. Serve immediately.

Now that the souffle is cooking, I am going to start on the soup. I am making a simple, tomato puree soup. I get the following ingredients handy: one tablespoon of butter; 1/4 cup diced onion; 1/4 cup diced celery (optional if you simply don't have it but can be missed); one tablespoon of all-purpose flour; 2 cups of beef broth; 2 cans of chopped tomatoes (with juice); 1 teaspoon of sugar; 1-2 teaspoons of dried basil (double if using fresh); and salt and pepper to taste. In a pot, I heat the butter over medium-high heat and when it starts sizzling I add the onion and celery to saute them. When the onion starts to get translucent, I add the flour and stir to coat the cooked onion and celery. Then I add the beef broth and stir it all quickly to prevent lumps of flour from forming. Then I add the tomatoes, basil, sugar and salt and pepper. I cook for at least 20 minutes; remove it from the stove and puree it using an inverted hand mixer. If you have croutons, you can float a few in the soup when serving to add a bit of crunch.

The souffle came out beautifully but by the time I got the camera it was already starting to deflate so it wasn't worth the picture. Next time I will take the shot while it is still in the oven...

Saturday, May 24, 2008

Quick Vegetable Soup

I have always leaned toward making heavier soups or stews and felt that they should be made a day ahead to really catch the flavors. However, there are times when you get home and suddenly crave a soup that is warm and flavorful but not out of a can.

One night while at a friend's house for dinner she completely changed my outlook - she made a wonderful pureed vegetable soup in about 30 minutes. Suddenly our whole outlook for winter changed - we could have soup much more often and I no longer had to make huge pots of one type of soup to freeze it for future use.

The beauty of this recipe is that it contained vegetables that I typically keep in my fridge; onion, garlic, carrot, zucchini, broccoli and potatoes. However, you can vary it if you lack an ingredient or want to tweak the flavor. Additionally, you increase or decrease the ingredients depending how much you want to make. It does freeze and reheat well but it is so easy to make on the fly that small batches are good too.

To start, rough cut all your vegetables - they don't have to be pretty because you will be pureeing them all. (I wash the carrots, zucchini, broccoli and potatoes with vegetable wash but do not peel anything.) Use the following amounts for a vegetables will produce roughly 10 cups of soup;

  • 1 small onion
  • 2-3 cloves garlic
  • 3 medium-sized carrots with skin
  • 2 medium-sized zucchini
  • 1 small head and stem of broccoli (or half a bag prewashed)
  • 5-6 medium-to-large baby potatoes with skin

In a larger, deep-sided pot heat about 1-2 tablespoons of olive oil and saute all the vegetables for about 5 minutes - stirring intermittently. Then add 1 quart of broth - I tend to use vegetable but chicken is also good. You want the liquid to just cover the vegetables so you might have to add another cup or so of water. Cook over medium to low heat until the carrots and potatoes are soft - about 20 minutes.

Turn off the burner and remove the pot from the stove (or to a cool burner). The fastest and least messy way to puree the soup it to use an immersion hand blender. However, if you only have a traditional blender you will have to puree in batches. I suggest using a slotted spoon to scoop out vegetables and using only a bit of your broth - this will minimize the danger of the lid of your blender "popping" off with the pressure from the heat. You might even consider letting the soup cool a bit before pureeing in a traditional blender.

When you have pureed the soup, salt and pepper to taste and add one teaspoon of dried thyme (optional but adds nice flavor). If you want the consistency to be a bit thinner simply add more broth or water. You can serve with wheat crackers and some nice mild cheese as a side. Frankly sometimes just having a bowl or two of soup with crackers and cheese is enough for us for dinner but usually I serve with oven-baked chicken thighs or a fillet of sole. If you are having a dinner party, you can simply use this as an opening course.

Thursday, May 22, 2008

One Dish Meal - Chicken Apple Sausage and Pasta


This is one of those meals that I whip together if I forgot to defrost anything. I almost always have some type of sausage in my freezer that is already cooked and just needs to be reheated. One of my favorite is Aidell's Chicken Apple Sausage; it has a light, smoky flavor and works well cooked with several types of vegetables. (My other favorite use for these sausages is for pigs-in-blankets appetizers but we will discuss those another time.)

If my sausages are frozen, I place four sausage links in a skillet with about 1/2 cup of water; cover them and turn the burner to medium-high. This will defrost them quickly and I will only have to cool them enough to slice them to toss with the vegetable saute.

Next, I set a large pan of water to boil for pasta. My favorite shape to use with this is a bowtie pasta a.k.a. Farfalle. I will use a bit over a half pound of the Farfalle. I give myself about 5-10 minutes for the pasta water to start boiling and another 10 minuts for the pasta to cook. The vegetable saute will be the "hardest" part of the prep for this meal.

The first step is to scope out my vegetable options; I find onion, garlic, broccoli, zucchini, spinach, crimini mushrooms, tomatoes, etc. I can use any combination of these but I choose the following:
  • half of a small, onion - thinly sliced;
  • 1 clove of garlic - finely chopped/minced;
  • 5-6 crimini mushrooms - thinly sliced;
  • 2 cups broccoli - cut into bite-sized pieces and steamed.

I set the burner to medium-high under a large skillet with a bit more than a tablespoon of olive oil (add more if needed). When the oil starts to smoke, I add the onion and saute it for 1-2 minutes until it starts to become translucent. I then add the garlic and when the smell starts to rise up from the pan, I add the mushrooms. As the mushrooms are cooking, I slice the sausage into bite-sized pieces. Just as the onion, garlic and mushroom mixture starts to brown I carefully add about 1/4 of white wine. (Alternatively, you can add broth but I like how the wine cooks away. You don't want very much liquid at all.)

Just as the wine starts to cook away (and it will happen quickly) I add the sliced, chicken apple sausage and the steamed, broccoli and stir it all together. At this point, turn off the burner, cover and set the saute to the side. If you pasta is cooked already, drain it, put it in a large serving bowl with 1-2 tablespoons of butter (this is optional but it adds a bit of richness to the sauce. Alternatively, use a vegan, heart healthy substitute like Earthbalance if you love butter like I do you honestly won't notice the difference.) Add the vegetable and sausage to the pasta and toss it all together. Then bring to the table so everyone can help themselves. I typically serve with bread and cheese as a side.

This recipe is typically enough for us to have a serving plus a bit extra for dinner and then enough for two lunches the next day.

Wednesday, April 30, 2008

20 Minute Meal


The weekends are at times a toss up as to whether we will eat at home or go out. I try to have something in the freezer or fridge that we can cook at the last minute if we decide to just stay home. Sunday night was the perfect example of this; we had spent our morning on our bicycle rides, followed by brunch and some errands. By the time we got home we were getting hungry but were not feeling up to going out for dinner so a quick meal was in order. However considering we both burned over 2,000 calories during our workout we also needed to eat something that packed enough nutrients to help us recover.

Thanks to a visit last Fall with another
Trader Joe's junkie we discovered their marinated fish in the freezer section. Trader Joe's has Ahi Tuna or Mahi Mahi marinated in oil, garlic, lemon, cilantro, red chili flake and black pepper. The marinade is very flavorful and to highlight it the best thing to do it serve it with a boiled grain and steamed vegetable. The beauty is that you can broil or pan-fry the fish and even frozen is doesn't take more than about 15 minutes.

I had defrosted the marinated Ahi Tuna steaks in the fridge for whatever night we decided to eat in. I decided to pan-fry them since the day is still warm and the oven being on will only heat up the house. I look around the cupboards for some quinoa grain, which is one of my new favorites; it is quick cooking (about 10 minutes) and high in protein, plus its mild, nutty flavor goes well with the marinade of this fish. Unfortunately, I seem to have run out and that is a bummer because I just went to buy all my bulks goods about a week ago so I am going to have to make an extra trip or go without for a while.

My next option is another Trader Joe's product - Harvest Grain Blend; this is a blend of couscous, orzo pasta, baby garbanzo beans and red quinoa that will also fit the bill of being quick and not a distraction to the marinade. My next option would have been plain pasta or even rice but my goal is to find the quickest option that has more of a nutrient kick. Following the instructions on the package, I boil some chicken broth (I happen to have a container open in the fridge and would rather use it before it goes bad). When it boils, I add a pat of butter and the Harvest Grain Blend, lower the heat, cover and set the timer for 10 minutes.

I have broccoli that I will steam so I set that up in the pan with water and turn the burner heat to medium. I have a tendency to forget to turn on my vegetables until everything else is about to be ready. This causes delay in eating and cold food that I hate so I find it is better to turn the vegetables on earlier, cook them at a lower temperature, and monitor them closely. If they happen to be ready a few minutes beforehand it is easy enough to drain and set them aside while you finish everything else.

Finally, I turn on the burner under my skillet and wait for the pan to heat up. Since I am cooking Ahi Tuna - which is typically served seared and raw in the middle - I have decided to not follow the instructions on time; it indicates 5-6 minutes of cooking time per side. I feel that the fish would be overcooked with so much cooking time so I decide to reduce it to a total of six minutes or three minutes per side.

When the pan is smoking a bit, I add the tuna steaks and pour on the marinade as well. Not the best idea really as the oil sputters and spatters all over my stovetop but I like the flavor of it and putting a lid over everything would ruin the browning I am striving for. I stir the Harvest Grain Blend because it has a tendency to stick and burn; the timer shows that I have a bet less than six minutes for it to cook. My broccoli is just starting to steam so everything should come together at the right time.

At about three minutes, I flip each steak - making sure I get the side in a bit of marinade for flavor. I stir the grain blend again and there is very little liquid left so I turn it off (it is a bit early but by to letting it sit there while the fish cooks and the broccoli steams it will finish cooking and not get overdone). With a bit over a minute left, the broccoli is done so I turn off the heat under the skillet with the fish and drain the water from the broccoli steamer. I then serve up our dinner that may only take 20 minutes to cook but we are so hungry it probably won't take more than five minutes to eat...

Welcome

Thanks so much for visiting our site. Please feel free to leave comments telling me what you like about the site or postings as well as any feedback that might make viewing easier for you.