Wednesday, November 19, 2008

Mole Poblano

Every year in the Fall many of my friends and family get together to make Mole Poblano – a recipe of Luis’ mother. If you are not familiar with mole, it is a pungent sauce used in Mexico for meats and fish; this version contains chocolate and several varieties of red chiles – plus a whole lot more. There are numerous varieties of mole using different chiles, different nuts and tweaking all kinds of ingredients. This version is wonderful with roast poultry, chicken enchiladas, and pork. It also adds complexity to chiles or sauces for tamales. The version we make isn't spicy and the flavor of chiles and other ingredients is wonderfully balanced.

The process is time consuming; with all the ingredients in hand it can take you six hours to make this. However, it makes the perfect gift and keeps well so you can have a supply through the year. The portions of the ingredients are based on estimates while my mother-in-law was cooking. She is flexible with the ingredients changing portions as dictated by availability of certain ones. For example, chiles below are for heat and color - if you want more heat add more guajillos, negros and mulato chiles.

The following dried chiles (any of the below can be replaced by its powder form although I don't have a conversion for that);
3 chile negros
10 chiles california
10 chiles anchos
5 chiles mulatos
7 chile pasillas
5 chile guajillos

The following nuts, seeds and other dried ingredients:
1 cup almonds
1 cup pecans or walnuts
1 cup peanuts
1/2 cup pumpkin seeds
2 cups sesame seeds
1/2 cup raisins
1 cinnamon stick
salt, pepper and sugar (for taste)
Fresh ingredients;
3 red tomatoes, roasted on the comal, peeled and cored
10 cloves of garlic
1 onion
1 plantain

Things you would probably have taking up space in your fridge/cabinets;
4 pieces of stale french/sourdough bread
2 stale corn tortillas
4 sweet biscuit cookies

Things you will need;
1 tablet of mexican chocolate
bottle or more of vegetable oil
endless supply of chicken broth (boullion helps add salt as well but is optional)
one roast chicken


With all the ingredients on hand you are now ready to start the process. Using rubber gloves (surgical type are best) de-stem and de-seed all the chiles. If you have two people working together you can have person start frying the nuts, chiles, etc. and the other peel garlic and prep the other vegetables. All the ingredients must be fried in the oil except the tomatoes and the chocolate. There is no order to what you fry when but for ease of clean up fry the sesame seeds last. [Frying the sesame seeds should be on a very low setting because they can sizzle and pop everywhere.]

After frying everything, the ingredients will then be pureed in a Cuisinart. The endless supply of broth will help here to keep the ingredients moist enough to form a smooth paste as you grind it down. The frying and grinding take the most time but eventually you will have this thick paste - the consistency of cookie dough. You then put the paste in a large pot, melt the chocolate in some chicken broth and add this with enough extra broth to brng it to the consistency of a thick soup. You will cook this mixture for an hour - adding more broth as needed. You will see towards the end the flavors fuse together and the mole will take on a darker hue.

After all that work, make sure you savor what you made - warm the roast chicken and slather it with some mole.

I purchase canning jars and fill with the mole and freeze once they are cooled down. This makes it easiest to give as gifts. Another good way to store is to pour into ziplok freezer bags, seal and lie flat so they freeze into little pallets.

I will share other ways to use mole seperately.

Thursday, August 14, 2008

Chile Rellenos - A Labor of Love


Chile Rellenos have to be one of my favorite foods. It is time intensive to make but always worth the effort. The flavor of the Poblano Chiles and the complement of the melted Monterey Jack Cheese offset by the tomato garlic sauce makes it a party in your mouth.

When I buy produce I keep my eye out for Poblano Chiles that are on the larger size and nice and firm. Then I have to make sure when I purchase of them that I will have time within the next few days to make this recipe.

I typically purchase six to eight Poblano Chiles at a time to make it more worth the effort. In order to peel the skins nicely from the chiles, I roast them Italian-style. I set the oven to 400 degrees. Then I wash the chiles, dry them, place them on an oiled cookie sheet and rub oil on each one. I place them in the oven for about 20-30 minutes - turning them occasionally to blister them evenly. When the skins seem to be bubbling away from the chile, I remove them from the oven, place into a large brown paper bag, close it and let sit for 20 minutes.

As I wait, I start setting up the next part of the process - setting up the souffle batter and frying oil. In a pie plate, I mix 1 cup of unbleached flour, 1/2 tablespoon of salt and 1 teaspoon of black pepper. I separate 4-6 eggs (depending on the egg size) and place the whites in a medium-sized bowl for beating. I keep the yolks to the side at the moment and hold off on whisking the egg whites just yet.

I empty two, 15-oz cans of chopped tomatoes into a saucepan and add half a chopped onion, two cloves of garlic, 2 teaspoons of oregano and some salt and pepper. I set this on the stove with the burner set to medium low. I will let this sauce simmer while continuing with the recipe. I set up a large, deep-sided skillet (about three inches deep) and fill it about an inch deep with vegetable oil. Lastly, I shred 2 cups of Monterey Jack cheese and set aside.

With everything setup, I return to the chiles. I cut the bag down one corner and around the bottom to have a flat surface in which to peel and seed the peppers. If the peppers have roasted long enough and steamed in the bag nicely, the skins will be a thin film that can be easily pulled off each chile. As you peel the chiles, you want to be careful that you don't tear the flesh underneath or pull out the stem. When they are each peeled, you then make a slice on one side, carefully open the chile and slice away the seed ball again trying to keep the stem intact. If you have extra seeds in the chile, you can gently rinse in cool water. [Be careful after doing this to avoid touching your eyes. You never know if one of the chiles is spicy.]

I turn on the oil to get it ready to fry the chiles. Using an electric beater, I whisk the egg whites until they are stiff but not dry. I stir up the egg yolks and gently fold them into the egg whites until they are well mixed. Next, I fill each chile with shredded cheese. They will be of varying sizes so I do my best to fill them equally. I sprinkle a pinch of flour over the oil and if it sizzles I start coating each chile with flour, gently coating them all over - even taking care to get it around the stem well. Next I put a chile into the souffle batter and gently placed it in the hot oil. I repeat this process fitting four chiles into the pan and cook on each side until the batter is golden brown.

When the chiles are cooked, I remove them to a separate plate with paper towels. I puree the tomato sauce in a blender and remove the oil from the pan. I let the pan cool slightly and then quickly add the tomato sauce and pop a lid on top. There will be a whole lot of spattering so the lid helps keep the mess down a bit. When the bubbling has died down, I add each battered chile to the sauce, turn the burner to medium low and carefully turn each chile to make sure they are coated with the sauce. I let this all simmer for a few minutes while I make sure everything else is set up for dinner.

I typically serve the rellenos with steamed rice and warm tortillas. As an extra, you can also fry plantains and/or serve with beans.

Pork Chops with Fried Rice

I love buying pork chops in the Mission District because you can get them cut real thin. The thinness of the cut allows you to cook them fast but without the worry of the center being raw.

I set up the pork chops to fry them. I dip each of them in an egg wash and coat them with breadcrumbs. Then I set them aside and let them dry a bit before frying them.

For a side dish, decide to make an Americanized fried rice with some leftover rice. I also had purchased some small pale - almost white - chiles in the Mission as well. I have used them before and they have a mild flavor. I take three of the peppers; de-seed and de-vein them then cut them into small pieces. I heat two tablespoons of oil in a skillet and saute the peppers with two chopped scallions (including the green tops). When the scallions are a bit wilted, I add the rice (about two cups worth) and when it is heated through I add 2 tablespoons of soy sauce and 2 tablespoons of water. Finally, I add a pinch of smoked salt (a Rainbow Grocery find) and 1 cup of frozen corn, cover it, turn the burner very low and then let it steam.

Next, I heat about three tablespoons of oil in a skillet and when it is hot, I fry the pork chops so that they are crisp and brown. When fully cooked, I serve a pork chop with a bit of the fried rice. The grilled frozen corn and smoked salt add the perfect hint of smokiness to the rice. All together it took about forty minutes to cook this dinner.

Sunday, August 3, 2008

Falafels - Middle Eastern Fast Food


I always enjoy a good falafels and it is really disappointing when you get one that is dry and overcooked. If you are not familiar with falafels - they are a made from garbanzo beans primarily with spices added and the mixture is fried.

For an instant dinner, I purchased falafel mix from an organic food store called Rainbow Grocery. With the mix, I merely had to add the requisite amount of water, whisk it up and form my falafels. Since they only take a few minutes on each side, I left them to dry while I made a side salad to compliment them.

I chopped 1 fresh tomato, 1/2 yellow bell pepper and two scallions. I tossed this in 2 teaspoons of olive oil and 1 teaspoon of balsamic vinegar with a bit of salt and pepper. Another short cut for this meal is that I purchased some tzatziki sauce, which is actually a Greek side/dip made with yogurt, cucumber and garlic or dill.

After setting up the salad and putting everything out on the table, I heated the oil in a skillet to fry the falafels. I cooked them about 2 minutes per side and then served everything up quickly. If I had planned a bit better, I would have had some pita bread on hand but they were very tasty even without the bread.

******************************************************
If you ever want to make falafels from scratch rather than a mix, I have listed a recipe I found online below;

1 cup dried chickpeas or 16 oz. can of chickpeas or garbanzo beans.
1 large onion, chopped
2 cloves of garlic, chopped
3 tablespoons of fresh parsley, chopped
1 teaspoon coriander
1 teaspoon cumin
2 tablespoons flour
Salt
Pepper

Turkey Meatballs and Fried Polenta


Sometimes I buy pre-packaged meatballs but really there is no substitute for freshly made ones. There actually isn't much difference between meatloaf and meatballs except shape, so if you mix well and don't overcook your meatballs will be light and fluffy.

Mix the following ingredients together;

  • 4 large eggs
  • 1/2 cup breadcrumbs
  • 6 tablespoons grated Parmesan cheese
  • 3 tablespoons olive oil
  • 1/4 cup chopped spinach
  • 3 large, cloves of garlic, minced
  • 2 teaspoons of salt
  • 1 teaspoon of black pepper
  • 2 pounds of ground turkey
Dig your hands in to mix all the ingredients well as with the meatloaf, if you mix it well and get enough air into it they will be light and fluffy. Form the mixture into 1 1/2 inch diameter meatballs. (You are free to make them larger or smaller as you prefer or time allows.)


Pour enough oil into a heavy skillet to coat the bottom; heat over medium-low heat. Working in batches, add the meatballs and fry until brown and cooked through, turning frequently. Approximate 10-15 minutes per batch. If serving with pasta sauce, undercook ever so slightly and add the meatballs to a pot with marinara sauce (about 2-4 cups depending on your party size - I sometimes freeze half of them for another night) and turn the heat to simmer.

Typically these are ideal served with rice or pasta. However, since I made polenta last night and pressed the leftovers into a bread pan. I am going to slice the polenta and fry the pieces. So as your meatballs are simmering, grab another skillet and add enough oil to coat the bottom of the pan. Remove the polenta from the bread pan and make about half inch slices. Gently add to the hot oil but have a lid handy as the water in the polenta will cause the oil to spatter. It can be very uncomfortable getting spattered with minute dots of hot oil but also it is very messy.

As a side vegetable, I merely boil some organic peas. Your side really should be whatever you have handy and like.

Polenta to Keep You Warm in the Cold Summer Nights


I have been craving warm and creamy polenta since San Francisco weather has been colder and foggier than is even typical in July and August. So believe it or not, summertime in San Francisco is the time for comfort foods.

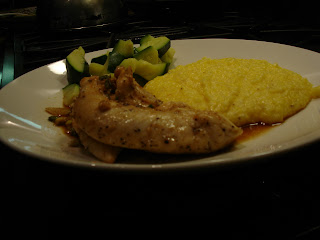
I decide to repeat a recipe from just a few weeks ago marinated chicken. I cook this part of dinner first since the meat cooks quickly and marinates after you broil it. The polenta will be quick but will require constant stirring. It will give the chicken plenty of time to marinate nicely.

I decide to round out the meal with steamed zucchini which will cook very quickly once the water boils. For now, I merely cut bit-sized pieces of zucchini and set up in the steamer. I won't turn it on until I have about five minutes left on the polenta.

Polenta is fairly neutral - a cornmeal mush really - but with a bit of butter and cheese added becomes a rich, creamy side dish. In a large, heavy kettle boil 6 1/2 cups of water. As it starts boiling, add 1 tablespoon of salt and turn the burner to medium low heat so that the water is just simmering. Add two cups of coarse-grained cornmeal in a fine stream - so that you can really almost see eat grain hitting the water - stirring with a wooden spoon. Continue stirring while adding all the polenta and then for the next 20 minutes. (Remember in the last five minutes turn on the burner under the zucchini.) The polenta is done when it tears away from the sides of the pot as you stir. Add 2 tablespoons of butter and 1/4 cup of grated Parmesan cheese.

The marinated chicken is a bit sweet; the polenta is creamy and cheesy; and the zucchini is completely neutral. Together they complement each other nicely and satisfy the craving for comfort food - bonus dinner took less than forty minutes. There will be quite a bit of polenta leftover, put it into a bread pan and refrigerate. In this shape you can easily slice and fry the polenta which is what we will cover next.

Meatloaf Rediscovered

I grew up insisting that I didn't like meatloaf but that was after trying it just once at the age of six. The memory of rubbery ground beef slathered with ketchup lingered for decades until I finally decided to find a recipe to that would replace it. It is great to have another option with ground beef.

This is another stand by recipe from How to Cook Everything by Mark Bittman. (pg 495) Preheat the oven to 350 degrees. Then the first step is to soak 1/2 cup of plain breadcrumbs in 1/2 cup of milk. Since it takes about 5 minutes for the crumbs to soak up the milk, I use that time to gather all my ingredients.

  • 2 pounds of ground meat (I typically use beef)
  • 1 egg, lightly beaten
  • 1/2 cup grated Parmesan/reggiano mix
  • 1/4 cup minced, fresh spinach
  • 1/2 teaspoon minced garlic
  • 1 small carrot finely grated
  • Pinch of dried sage
  • Salt and pepper to taste

Once the breadcrumbs have fully soaked up the milk, I just throw in all of the above ingredients, take off my watch and rings, and use my hands to mix all the ingredients together. Mixing it well and getting a bit of air in there makes the meatloaf light and fluffy.

When the ingredients are mixed, I then place them in an 11x13 baking dish and shape into a loaf in the middle of the pan. Doing this rather than baking it in a loaf pan allows the grease to roll off a bit rather than just cooking in it. Place it in the oven and cook for 45 to 60 minutes, basting it occasionally. When it is done, the meatloaf will be browned and firm to the touch. If you have a meat thermometer, insert it in the middle of the loaf it should read 160 degrees.

While the meatloaf is baking, I set up about 10 small potatoes to boil for mashed potatoes. I prefer new potatoes because you don't have to peel them. I usually give myself about 20 minutes to cook the potatoes and mash them so I don't start them right after putting the meatloaf in the oven. When the potatoes are cooked, I drain most of the water - just leaving a few tablespoons - I add a couple of tablespoons of butter, a couple of tablespoons of milk, a heaping spoonful of yogurt and mash them with a hand masher. The only other addition is boiling some frozen organic green peas.

A tasty meatloaf is comforting and warming meal. The mashed potatoes and peas round it out but options are serving the meatloaf with a nice side salad.

Thursday, July 17, 2008

Plum Crazy


Summertime presents a bounty of fruit even within the urban confines of San Francisco. Danielle and I ventured over to my mother's place in the Marina District answering the call to help pick plums. We were more than happy to climb ladders, tree limbs and fences in search of ripe fruit in the upper reaches.

Danielle was definitely more fearless and got right into the thick of things; climbing barefooted and balancing on wobbly fences. The picture here is us reaching over into the neighbors yard for cherry plums. They are small, yellow/pink plums that are like nothing I ever tasted. My mother says that all the surrounding yards used to have those plum trees but when the houses got new owners and re-landscaped they ripped out the trees because the fruit was too messy. I can imagine how the neighborhood was long ago, filled with largely Italian families all harvesting fruit from the trees and making jelly.

You never know what kind of bounty you might have in your own yard if you just moved into a new place. Even if you aren't a gardener, check it out and you might re-discover what fruit is supposed to taste like. Most of what we buy in the stores is not tree ripened and ultimately tasteless. Just one or two generations ago, people used to grow and harvest their own varieties of fruit and vegetables. They canned and preserved what they couldn't eat to keep enjoying their crops through the winter months and to share with friends/family. I am going to try to plant one of those cherry plum trees myself from the pits. I don't care how messy they are too tasty to risk losing. Plus I know my family, friends and the birds will enjoy them if I can get them to grow.

Jam and jelly making isn't a lost art but fewer people I know are doing it. Until recently, Danielle was the only person my age that I knew who did it. I have since met one or two other women but it seems to be a tradition they got from their mothers or grandmothers. (I find it very daunting myself but it really isn't much more than boiling fruit in water, adding sugar, straining the juice then boiling again to the "jelly point.")

I prefer to bake with fresh fruit and I tend to freeze extra for the winter months. I have been eating many plums every day since I picked them but plan to make a plum dessert with more of my bounty. The following are two recipes for plum desserts;

**************************
  • 6 tablespoons white sugar, divided
  • 14 Italian prune plums, halved and pitted
  • 3 eggs
  • 1 1/3 cups milk
  • 2/3 cup all-purpose flour
  • 1 1/2 teaspoons grated lemon zest
  • 2 teaspoons vanilla
  • 1 pinch salt
  • 1/2 teaspoon ground cinnamon
  • 2 tablespoons confectioners' sugar
Preheat the oven to 375 degrees F (190 degrees C). Butter a 10 inch pie plate, and sprinkle 1 tablespoon of sugar over the bottom.

Arrange the plum halves, cut side down, so that they cover the entire bottom of the pie plate. Sprinkle 2 tablespoons of sugar over the top of the plums. In a blender, combine the remaining 3 tablespoons of sugar, eggs, milk, flour, lemon zest, cinnamon, vanilla, and salt. Process until smooth, about 2 minutes. Pour over the fruit in the pan.

Bake for 50 to 60 minutes in the preheated oven, or until firm and lightly browned. Let stand 5 minutes before slicing. Dust with confectioners' sugar before serving.

********************************

Plum Cobbler

Preheat to the oven to 425 degrees F.

FILLING

  • 7 cups of pitted plums, cut in quarters
  • 1 1/4 cups of sugar (usually plums are a bit tart but the ones I picked are very sweet so I will reduce this to 3/4 cup)
  • 2 tablespoons of lemon juice
  • 4 tablespoons of butter (1/2 stick)

Place the prepared plums in a 8-inch square baking pan and sprinkle with the sugar. Drizzle on the lemon juice and dot the plums with butter. Set aside to make the biscuit topping.

BISCUIT TOPPING

  • 1 cup of flour
  • 2 tablespoons of sugar
  • 1/4 teaspoon of salt
  • 2 teaspoons of baking powder
  • 4 tablespoons of butter (1/2 stick), chilled
  • 6 tablespoons of milk

Combine the dry ingredients in a large mixing bowl and stir them together using a fork. Cut the butter into bits, drop into the bowl and work it into the dry ingredients using your fingers, a pastry cutter or two knives. You want it to be a mixture of fairly even and fine crumbs. Slowly add the milk while stirring constantly with the fork.

There are two options for covering the cobbler. My preference is the spoon the biscuit dough over the top so you can see the fruit and juice bubble through. Then you can ignore the need of adding a separate glaze.

However, you can also completely cover the top. So if you prefer this second method, continue with the following steps; gather the dough together and place on a lightly floured surface. Knead 8 to 10 times, until dough it fairly smooth then roll or pat the dough into a shape that will cover your baking dish. Place the dough over the prepared fruit, pressing it down around the edges. For a glazed crust, drizzle 2 tablespoons of melted butter over the top and sprinkle 1 or 2 tablespoons of sugar over that.

Bake the cobbler for 35 to 45 minutes or until the juices are bubbling, the crust is golden brown and the fruit is tender. Remove from the oven and place on a rack. Serve warm or room temperate.

*************************

Happy harvesting!

Wednesday, July 16, 2008

Cannelloni with Crepes


Many are familiar with cannelloni being made using pasta but there is a whole contingent that feel superb cannelloni is made with crepes. I like both ways but the crepe seems to deliver a more delicate dish. If you are making this for a party, I strongly suggest doing it at least a day ahead and even in stages. There are a whole lot of parts to make but taking the time makes for an amazing presentation and truly satisfying meal.

Crepe batter is best when it is given the good part of the day to sit; the flour has more time to absorb the liquid. Using a large blender (or split the recipe and do it in batches): measure 2 cup of milk, 2/3 cup of water into it then add four large eggs, 2 cup of all-purpose flour, 1/2 teaspoon of salt and 4 tablespoons of melted butter. Once all the ingredients are in the blender, I put the lid on the jar, put it on the base and blend until smooth for about 5 seconds. I put the blender jar directly in the refrigerator and leave it there until I am ready to cook the crepes. (At the very least the batter should sit for an hour; two is preferable. It can last for up to 24 hours.)

*************
MAKING CREPES
Ideally, you do need a crepe pan since you can more easily judge the size and thinness of the crepe with it. I try to avoid buying kitchen gear that serves only one purpose but in this case I find it necessary. To set yourself up, have a cooling rack (such as you would use for cookies) handy in which to place the crepes once cooked.

You want to have your pan on a burner set to medium-high heat. You will need a paper towel lightly coated with butter (you can use any type of oil but butter is preferable to achieve the right browning); you will brush this lightly over the surface of the pan so that the metal is shiny but you don't want any sizzling butter or oil. Pick the pan up off of the burner and pour 2-3 tablespoons of batter for a (6 or 7 inch pan; 1/4 cup for a 9 or 10 inch pan) on the pan while tilting and rotating to spread the batter to the edges of the pan - coating the pan's surface.

Cook until almost dry on top and lightly browned on the edges; about a minute. Loosen the edges of the crepe from the pan with a spatula and then flip the crepe over and cook for another 15 seconds or so. Turn the crepe onto the cooling rack and continue the process until all the batter is used; continue stacking the crepes. This recipe should make about 16 or 20-6 inch crepes.

*************
MAKING THE MEAT SAUCE
Heat a 1/4 cup of olive oil in a saucepan and add 2 tablespoons of finely chopped onion. Saute until golden; add 12 ounces of lean ground beef and turn the burner down to medium low. Cook the meat without browning. Crumble the meat as it cooks using a fork. When it loses its red raw color, cook it for one more minute without letting it brown. Add 2 teaspoon of salt and 1 cup of chopped canned tomatoes with their juice. Cook at the barest simmer for 45 minutes.

*************
MAKING THE FILLING
Heat a 1/4 cup of olive oil in a saucepan and add 3 tablespoons of finely chopped onion. Saute until golden; add 12 ounces of lean ground beef and turn the burner down to medium low. Cook the meat as you did above - without browning. Transfer the meat to a fine mesh colander and let the fat drain away.

When it is drained, place in a medium-sized bowl and add the following ingredients:
  • 3 teaspoons of salt
  • 1 cup of mortadella (Italian bologna) or unsmoked ham
  • 2 egg yolks
  • 1 teaspoon nutmeg
  • 3 cups Parmesan cheese
  • 2 1/2 cups of ricotta cheese

Mix all the ingredients thoroughly, taste and correct salt if necessary. Set aside for when it comes time to assemble.

*************
MAKING THE BECHAMEL SAUCE

Heat 4 cups of milk until it comes to the edge of a boil. Meanwhile, in a large enameled saucepan, heat a stick of butter (8 tablespoons). When the butter is melted add 6 tablespoons of flour and stir constantly. Let the flour and butter bubble for 2 minutes but do not let it color/brown.

Turn off the burner and remove the skin from the top of the hot milk. Using a whisk or wooden spoon stir the flour mixture constantly while adding 2 tablespoons of milk at a time. Before adding more milk, make sure that what you added is incorporated into the mixture. After you have done this four times (added the equivalent of 1/2 cup of milk) you can start adding 1/4 cup of milk at a time.

When all the milk has been incorporated, turn the burner on again to low, add 1/2 teaspoon of salt and, while stirring constantly, cook until the sauce is as dense as thick cream.

********
ASSEMBLY & COOKING
Preheat the oven to 400 degrees. Take a bake and serve pan 9x14 inches and butter the bottom.

Take a crepe and place about 2-3 tablespoons of filling down the middle then roll into a "flute." Place this into the prepared pan and repeat the process until you have filled all the crepes and/or finished the batter. Squeeze the cannelloni in tightly but do not stack.

Spread the meat sauce over the cannelloni, coating evenly. Spread the bechamel sauce over this. Sprinkle with 2/3 cups of Parmesan cheese and dot with about 1/4 cup of butter. Bake on the next highest rack in the oven for approximately 15 minutes, or until a light brown crust forms on the top. (Do not cook more than 20 minutes regardless.)

Allow to settle for 10 to 15 minutes before serving. The cannelloni is a very rich dish so goes well with a nice green salad or bruschetta mix (without the bread).

Thursday, July 10, 2008

Lamb Tenders and Supposedly Spoon Bread


I have been craving spoonbread, which is a dish my mother occasionally made when I was a kid. I loved it and couldn't get enough of it but have never attempted it myself. It is a slightly custardy, cornmeal side-dish; a cross between pudding and bread. I have never attempted this recipe myself but I decide to try. However, I found the recipe to be too complex so I looked for a variation that is less time consuming. The results were good but not what I was looking for so I will have to suck it up and be patient next time.

I have defrosted lamb tenders (1 to 1 1/2 pounds) and decide to marinate and broil them. My marinade consists of about 3 tablespoons of olive oil; two cloves of rough chopped garlic; 1 sprig of fresh rosemary, also rough chopped; pinch of salt and pepper; and 2 tablespoons of red wine. I set this aside while I move on to assemble my side dishes.

I set the over on to 375 degrees and collect my ingredients. I place 4 tablespoons of butter (half a stick) into a round deep casserole baking dish and set it on the stove over medium heat for about two minutes taking care not to burn the butter. turn off the heat and let it stand there. You can also use a cast iron skillet for this recipe. Next, I place all my dry ingredients in a large bowl: 1 1/2 cups cornmeal; 1/2 cup of all-purpose flour; 1/2 teaspoons of baking powder; 1 teaspoon of salt; and 1/4 cup of sugar. Next in a separate bowl, I combine 2 eggs yolks (set the whites aside for the last step) with 1 1/4 cup of milk (you can substitute buttermilk or yogurt here). I stir the wet ingredients into the dry ingredients and combine until smooth. Then I beat the two egg whites until stiff but not dry. I gently fold them into the batter until smooth then place the finished batter into the baking dish and put it in the oven to bake for 45 minutes.

I decide to not cook the lamb until the bread is finished because the meat will need to broil no more than 5 minutes per side. While I am waiting I periodically move the lamb around in the marinade to coat it evenly. When it is time to cook it, I set the broiler to Hi and place the lamb tenders on a broiler pan on the uppermost rack. I remove from the oven when each side has cooked for approximately 4-5 minutes and let stand.

To offset the baked bread and cooked meat, I decide to serve a cherry tomato salad on the side. I cut about 10 cherry tomatoes in half and toss them with a bit of olive oil, balsamic vinegar, salt and pepper. I slice the lamb tenders into bite-sized pieces, spoon a portion of the corn bread and a serving of tomatoes.

The bread is light and fluffy but there is no sign of a pudding texture. It is tasty and I am only disappointed because I really am still craving spoonbread.

Marinate After You Cook?


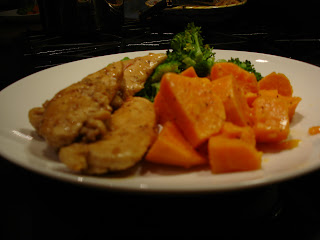
I cook chicken a whole lot but really it is so versatile it is hard to get sick of. I had defrosted some breast tenders and decided to look for a new way to cook them in How to Cook Everything by Mark Bittman.

I found a recipe that you can grill or broil chicken cutlets but the thing that caught my eye is that you marinate the chicken after cooking so I decided to try it.

I set the broiler to Hi then rinse and pat dry my chicken tenders (about 1 to 1 1/2 pounds or equivalent of two breasts). I rub the tenders with 1 tablespoon of vegetable or peanut oil and the cut side of a 1 clove of garlic then season them with salt and pepper. I place them on a cookie sheet and place on the top rack of the broiler and grill for 2-3 minutes per side. (If you have thicker pieces I would broil for 3-4 min per side. I hate dry chicken so I prefer to cook it for less time as I know it will continue to cook in the post-marinade.)

While the chicken is broiling I assemble the marinade. In a saucepan, I place the following ingredients: 1/2 cup of rice vinegar; 1 tablespoon honey; 1 tablespoon of water; 2 tablespoons of soy sauce; 1 tablespoon peeled and minced ginger (I was out and substituted just a mere teaspoon of dry); and 1 tablespoon of prepared horseradish. I simmer the ingredients over medium-low heat for about two minutes. When the chicken is cooked, I place it on a serving platter and cover it with the marinade. Then I let this sit there while I prepare the rest of the meal. You can serve right away if you prefer.

My side dishes will be boiled sweet potatoes and steamed broccoli. I prefer to keep things simple with the vegetables to not add extra calories or prep time. I simply peel and cut three medium-sized sweet potatoes, cover with water and boil until a fork can easily pierce a chunk or two. I then toss with a bit of butter and salt and pepper but this is optional. For the broccoli, I simply place about two cups of cut up broccoli into a steamer and steam until just soft. I strongly dislike mushy broccoli so I really keep an eye on it and drain the water immediately to stop it from cooking.

While the vegetables are cooking, I periodically move the chicken around in the marinade to coat it evenly. When the vegetables are cooked I simply serve them with the chicken at room temperature.

Tuesday, July 1, 2008

My Idea of a Pre-Packaged Dinner

I may have forgotten to defrost something for dinner but fortunately I have back-up meals that can quickly be thrown together. Tonight it is carnitas that I purchased pre-cooked from Trader Joe's. They are frozen but easily defrosted in the microwave. I remove the carnitas from the packaging, place in a microwave safe bowl and set the timer for 2 min increments.

On top of that I picked up a can of whole organic pinto beans during my last shopping trip so I open those and throw them into a saucepan to heat up. Luis is a bean purist so he prefers I leave them plain. However, adding a crushed clove of garlic enhances the flavor a bit.

My first plan was to make some fresh guacamole since I had a large avocado, some tomatoes and cilantro. Unfortunately, when I cut open the avocado I find it is has gone bad so I have to change my plan and make a fresh tomato salsa. This salsa has to be made quickly since my meat is already warmed up and Luis is making the quesadillas as I set everything up. I core two tomatoes and slice each into eight wedges. I remove some of the seeds as I go but don't get too picky about it. I mince some onion (about 1/4 cup worth) and add the juice of 1/2 of a lemon. (Lime would be preferable but I am making due with what I have.)

As I look for the cilantro to finish it off I realize that I threw it out two days ago. Fortunately, I purchase frozen herbs as a backup. Many grocery stores sell little flats (4x3 inches) of cubed servings of frozen herbs and garlic. I keep basil, cilantro and garlic in the freezer in case I happen to have a recipe that calls for them and I have either run out or not had time to buy fresh herbs in advance. I throw three cubes of cilantro into the salsa and add a pinch of salt.

While I have been setting everything up, Luis was making quesadillas on the comal. He briefly heated each corn tortilla on the comal, add a bit of shredded monterey jack (about 2 tablespoons per tortilla), folded and placed back onto the comal to heat them each enough to melt the cheese. (If you don't have a comal you can us a skillet for this. A pan typical to what you would use for a grilled cheese sandwich but don't add any oil.) You want to time them so that they come off the comal as you are serving your food since they get cold really easily.

Broiled Pesto Chicken

This is a quick and very tasty way to cook boneless chicken breasts in the broiler. I typically keep a stash of frozen pesto in my freezer and the brand I use is Armanino as it reminds me of homemade pesto.

This whole meal won't take more than 20 minutes or so. First turn the broiler to high and line a cookie sheet with tinfoil. Next place your chicken breasts in a plastic bad and give them a few whacks with a meat tenderizer. This will flatten the breasts out and allow for more even cooking. Place the breasts on the cookie sheet, apply pesto to the tops of each and place in the broiler. (When you flip the breasts you will add more pesto to the other side.)

You can make any type of side to go with this; mashed potatoes, boiled potatoes, pasta salad. In the picture, I chose to use a pasta grain blend that I find locally. It has quinoa, couscous, orzo pasta and lentils that cook up in about 10 minutes.

After I put on the pasta grain blend to boil and set the timer for 10 minutes, I check the breasts to see how they are coming along. It has been about 5 minutes so I take the sheet out of the oven, turn over the breasts and coat the other side with pesto. I then pop the cookie sheet back in the oven and let cook for an additional 3-5 minutes. [Depending on the temperate of your broiler you may need a bit less or even more time. It is important to not overcook the breasts to avoid having them dry and stringy.]

When the breasts are done and the side it cooked have everyone serve themselves. We decided to forgo the vegetables this evening but you can make a salad as a side to this for your greens.

Friday, June 27, 2008

Chicken Enchiladas and Fried Plantains


It has been a lazy week in terms of cooking. I have taken a break from food blogging for two reasons; I have been experiencing Food Blahs and I have been practicing my photography. Food Blahs are a periodic episode where food really doesn't interest me and cooking happens out of necessity more than pleasure. This is one reason I freeze extra leftovers - perfect backup for when you don't want to cook. As for the photography, I received constructive criticism from several sources about my images. To address that, I have been playing around with a fancy camera I own but never really use. It won't happen right away but hopefully you will start noticing an improvement to the images I post of the meals.

As for the Food Blahs, three very black plantains wake my palate again and chase them away. As I test the plantains for ripeness and find them to be perfect, I start thinking about what I can make to go with them. When you buy plantains you want them to be almost black and soft that way when you fry them they will have a nice, sweet flavor which complements spicy food very nicely. Under ripe plantains are practically inedible (think cardboard diskettes) so don't force this part of the recipe if you cannot find them.

Enchiladas can be a good quick meal because it is easy enough to poach chicken breasts (even if they are frozen). Better yet you can purchase a roasted chicken and shred some of it for enchiladas - which is the scenario I am using today. I have a whole roasted chicken and I shred the meat from a thigh and a breast into bite-sized morsels and set aside.

I read a nifty tip to soften the tortillas in my latest issue of Cook's Illustrated. You coat them with cooking spray and heat them in the oven. Since this is something I want to do right before I am ready to assemble, I merely turn the oven to 325 so that it will be warm enough when it comes time to pop them in. I will go into more detail about the process of warming a few steps later.

Meanwhile I decide to use a tomato-based sauce for the enchiladas. I roast three, medium-sized tomatoes on my comal until the skins start to blister. I keep moving the tomatoes around the comal until they are as evenly browned as I can manage and soft enough to remove the skins. I carefully cut away the core (where the vine stem attaches), place the tomatoes in my blender and puree them. I add this sauce to about half a cup of mole poblano and 1/4 cup of chicken stock. [If I was out of mole poblano I would use dried chiles like the California/Anaheim and cloves of garlic. I would soak about 4 dried chiles - after I have destemmed and deseeded them - in a bit of warm chicken broth. I would roast 2-3 cloves of garlic on the comal with the tomatoes. Then I would put everything in the blender; roasted tomatoes, garlic, chiles and chicken broth and puree it all together.] Reserve 1/4 -1/2 cup for garnishing.

Since I have shredded the chicken and set up the sauce, it is time to warm the tortillas for assembly. I spray 15 corn tortillas on both sides with cooking spray (I am using Canola spray), and lay them out in a single layer on two cookie sheets. I put the sheets in my pre-heated oven and let them warm for about 3 minutes. As they are warming, I take a 9x13 inch baking dish, oil it and coat the bottom of the baking dish with a bit of sauce.

When the tortillas are warm, I remove the sheets from the pan and carefully remove a tortilla, place it on top of the sauce from the baking dish, add a bit of chicken, wrap the tortilla around it and place the enchilada with the seam underneath. Repeat this process until all the enchiladas are rolled and placed in the baking dish. Pour the remaining sauce over the enchiladas in the baking dish and cover everything with shredded cheese; 1 to 1 1/2 cups of shredded mozzarella or monterey jack cheese. Cover the dish with aluminum foil and place in a 450 degree oven for 20 minutes.

While the enchiladas are heating up, I cook the plantains. I remove the peel from each plantain by making a shallow slice through the skin down the length of each. Then I pull back the peel, remove the tips of each and slice a bit at an angle. Next, I heat about 1/3 cup of canola oil (or any neutral flavored oil) in a large skillet and gently fry the plantains in batches. You want them to be nicely browned on both sides. As each batch is ready to be removed from the oil, I carefully scoop them out with a slotted spatula, drain the oil a bit, and place on a paper towel, covered plate. When they are all cooked I set them aside someplace warm (although I don't mind if they get to room temperature).

Finally, I set up all the fixings. I love topping these with a crisp, shredded iceberg lettuce but I don't typically buy it unless I am making these for a big party. As an alternate, I slice up three scallions (want mostly just the green tops but I decide not to waste any and use them all); 1/3 cup of cilantro leaves (you could chop if you feel up for it); and slice 1/2 an avocado. I place all these fixings (as well as the reserved enchilada sauce in a small pitcher) on the table so everyone can garnish their own enchiladas. When the enchiladas are done, I serve one to three per person and add some plantains to the side.

Thursday, June 19, 2008

Prosciutto and Veggie Pizza


It is pretty easy to make pizza dough however, for a quick meal I just grab the ready-made pizza dough while shopping for my weekly groceries at Trader Joe's. My favorite is the Garlic and Herb dough because it adds a bit more flavor. About 20-30 minutes before you are getting ready to set up you want to take the dough out of the refrigerator, remove it from the plastic bag and let it sit on a lightly, floured board. You will leave the dough there for 20 minutes giving it time to get to room temperature and acclimate.

As the dough is sitting, I set up my ingredients for a pizza: 3 slices of prosciutto, cut into smaller pieces (you could fry these up and add them as crisp bits - al la bacon bits); 4 crimini mushrooms, washed and sliced; 2 scallions, with green tops included and chopped; 1/2 cup of tomato/pasta sauce; and approximately 1 cup of shredded cheese (I have a four cheese blend and some Mozzarella.

I set the oven to bake and preheat it to 450 degrees. Then I take out a cookie sheet with no sides and lightly spray it with olive oil. When my dough has been sitting for about 20 minutes, I gently knead it (adding more flour as necessary) and roll it a bit with a rolling pin. It takes a bit of work to stretch out the dough to a 10" circle as it keeps shrinking back down. As you get it close to the size you want, put it on the greased cookie sheet and continue to work and shape it. The oil should help keep it stretched out but don't hesitate to start adding your toppings.

Spread the tomato sauce around the dough and try to coat it as evenly as possible. Sprinkle the chopped scallions over the sauce; then carefully spread the prosciutto over everything; top that with the mushrooms (you could saute them a bit first but in the interest of saving dishes I keep them raw); and finally I cover everything with shredded cheese - add more or less per your preference.

Pop the sheet with the pizza into the hot oven and set the timer for 10 minutes. After 10 minutes - if the bottom of the crust seems to be firming up - slide it off the cookie sheet directly onto the oven rack to cook another 10 minutes. [To prevent drippings in your oven, place the cookie sheet on the rack directly below the pizza.] Using a cookie sheet without sides allows you to transition the pizza on and off and then back onto the sheet as necessary. When removing the pizza from the oven, you will want to put it back onto the cookie sheet because it is easier to deal with and you can cut it directly on the pan.


The dough of this pizza is a bit thicker than I prefer but it has a nice flavor and it fits the bill of a quick wholesome dinner. I serve the pizza with a side salad of heirloom tomatoes with a dash of basil infused olive oil and balsamic vinegar.

Wednesday, June 18, 2008

New Twist on Oven Baked Chicken


I really had a problem figuring out what to make for dinner and changed the menu as I encountered obstacles. I had originally decided to make pizza but changed the plan when I realized there were some cooked pinto beans that had to be used. So I decided to use the beans to make bean tacos and make pizza another night. Typically Luis uses canned, refried beans so it was new for me to try this with freshly made beans.

The beans that have to be used are whole and in a lot of broth. I will have to mash them and re-cook them with a bit of oil - aka refried beans. Using a potato masher, I mash the beans in the container while I heated a bit of oil in a medium-sized skillet over a medium-high burner. However, as I am mashing the beans I realize that they are way too soupy for bean tacos. I probably should have drained some of the fluid prior to mashing. So again I decide to change the menu and just serve refried beans.

Now I have to change my original plan for the chicken. With bean tacos I would have used a simmered sauce recipe for chicken. However, changing my plan has given me less time to really achieve the right flavor for a simmer sauce. Plus I realize that I am too hungry now to take the time. I want dinner to be made quickly and decide to do oven-baked chicken but I am going to make it more spicy. I preheat the oven to 400 degrees and prep a cookie sheet with a sheet of aluminum foil sprayed with olive oil.

I open a package of boneless chicken thighs (about six thighs) and rinse them in lukewarm water. I decide not to dip the thighs in eggs or milk (mostly due to laziness) so I set them aside while I prep the breadcrumbs. I use a bit over a cup of breadcrumbs, mix with 1/3 cup of Parmesan cheese, 1 tablespoon of chili powder, 2 teaspoons of thyme, and a bit of salt and pepper. I roll the thighs around the breadcrumb mix, put each one on the cookie sheet and pop she sheet into the oven. (Usually the oven is still pre-heating when I pop the chicken in.)

As the beans are re-frying, they are thickening up but they are still not thick enough to make into bean tacos so I feel justified in changing this meal the way I did. I turn them off for now since the chicken is still cooking and I need to make a bit of sauce for the chicken.

I heat the comal over a high burner and roast two fresh tomatoes and two garlic cloves. When the skin of the tomatoes starts to blister, I take them off the comal, remove the skins and place in the blender with the roasted garlic. I puree the tomatoes and garlic then heat a bit of oil in a medium-sized saucepan and pour the puree into it. I add 1 teaspoon of oregano and a bit of salt and pepper for flavor. I let this cook until the sauce gets a bit darker.

I check the chicken and turn over the thighs. The side of the thighs that was on the cookie sheet is nicely browned and crisp so it is the perfect time to turn them over. I set up each plate with a quarter of an avocado, thinly sliced and wait for the chicken to finish cooking (total cooking time is 25 to 30 minutes).

Dinner at a Friend's House


A night out is always a treat and it is wonderful to share a meal at a friend's house. We had an impromptu dinner party midweek. Danielle invited Luis and I over for dinner and suddenly found herself hosting Luis' godfather, Jose Luis - unexpectedly in from Mexico - and Luis' mother, Trini. She was a great sport about the whole thing and it was a wonderful meal and evening.

Danielle found a recipe for Chicken Tenders with Cilantro Pesto online recently and decided to make this for our group. It was a very tasty meal and very easy to make. First she set up the marinade; 1/4 cup lime juice, 1/4 cup soy sauce, 1 tablespoon of canola oil and 1 teaspoon of chili powder was placed in a large bowl and whisked briefly. She reserved 2 tablespoons of the marinade and placed it in the bowl of her food processor (for the pesto). She added the chicken tenders to the remaining marinade and tossed it a bit to coat each piece. She set this aside to marinate (should give it 20 minutes to 1 hour).

While the chicken is marinating, Danielle started making the pesto. She toasted 2 tablespoons of sesame seeds in a small dry skillet over low heat and stirred them constantly until they were golden and fragrant (about 2 minutes). As she was keeping an eye on the sesame seeds she placed the other ingredients in the food processor with her reserved marinade; 1 bunch of cilantro (stems removed by twisting about mid-bunch) and 2 shallots roughly chopped. When the sesame seeds were toasted she added them to the food processor and processed the mixture until it was fairly smooth. (The recipe calls for scallions but the shallots add that hint of garlic which I think it more important for a pesto.)

To round out the meal, Danielle served the Quick Vegetable Soup (another recipe I got from her), some steamed quinoa and steamed asparagus. Everything was delicious and Jose Luis - Luis' godfather had a lot of fun as did all of us.

Thursday, June 12, 2008

Sopa de Tortilla

My favorite Mexican cookbook is Authentic Mexican by Rick Bayless. My mother gave Luis and I a copy for Christmas in 1998 and it has become a staple cookbook for me ever since. His cooking shows are really fun to watch as well. In February 2007, I had the opportunity to host a work function in Chicago and jumped at the chance to book his restaurant Topolobampo. For the event we chose the Chef's Tasting menu and one of the items served was the Sopa de Tortilla; I have been craving it ever since. I just want to book a trip back to Chicago so I can eat there again. (Also most amazing margarita I have ever had...yum.)

Since this is a very brothy soup, it is recommended to have a really good broth. Fortunately, my mother insisted I save the bones from the last time I stripped a Costco roast chicken. Her winning argument was that they would make a wonderful broth and she was very right. I took the bones of one chicken carcass and put it in a pot with half an onion, with the root end still attached and 2-3 celery stalks, roughly chopped. I filled the pot with water until it covered everything, loosely covered the pot and let simmer for two hours.

Next I took about eight corn tortillas that I had in the fridge and sliced them first in half and then into thin strips. It is best if you use stale/older tortillas for this as they crisp better when you fry them. Heat 1/3 cup of vegetable oil in a skillet. Set up a cookie sheet with paper towels to have for the cooked tortilla strips. (You don't want to be doing this after the strips are ready to come out because you risk burning them.) I test to make sure the oil is the right temperature by throwing in a small corner of one of the strips - if the oil bubbles vigorously around it then it is the perfect temperature. I then throw in the cut up strips and move them around the pan to keep them separated. I keep an eye on them and continuously move them around until they start turning a deep golden brown. Then I immediately remove them with a slotted spoon and let them cool on the paper towels.

Take 1-2 dried chile pasillas and remove the stems and seeds. Then tear into smaller pieces and soak in a bit of broth. (In this case I actually only had a bag of dried Catarina chiles. the description says they are pungent and have tones of wild berry and tobacco. They are red and will add a complexity of flavor so they fit my bill.) Next, I take out my comal and set it on a high burner. When the comal is hot, I place one medium-small tomato on it and roast it on every side. (Alternately, you can drop it into boiling water for a few minutes.) When the skin is blistered, you will remove it from the comal (or water) and cut the tomato into quarters. Finally remove the seeds and core and throw the tomato into the blender. Next slice one medium onion and rough chop two cloves of garlic. Heat one tablespoon of oil or lard over medium high heat and cook the onion and garlic until both are deep golden brown. Add the cooked onion and garlic and softened chiles with the liquid to the blender with the tomato and process until smooth.

Now after two hours your broth should be pretty flavorful (since the bones were from a roasted chicken you could have probably gotten away with just an hour of boiling). Turn the burner off and using a slotted spoon gently remove the bones, onion and celery. You could also pour this through a strainer into another pan but I try to minimize dirty dishes. Now heat another tablespoon of oil or lard in your skillet and carefully pour the tomato mixture in the pan and constantly stir until the mixture is thicker and darker - about 5 minutes. Add the this mixture to the broth, partially cover and simmer for 30 minutes.

Now set up your bowls with a bit of the crisp tortillas and some cubed or grated cheese (for 6 servings you will need about 2 cups of queso fresco or some sort of soft cheese; Muenster or Monterey Jack.) Right before you are ready to eat, you will ladle some broth directly over these ingredients and serve immediately.

It isn't the simplest soup to make but it sure is memorable. Luis returned from his bicycle ride the following day - he said he had spent much of his return trip just thinking how good a bowl of the soup would be when he got home. Unfortunately it wasn't on the brunch menu!

Frittata - the Fail Safe Plan for Dinner

So one night last week I had no plan for dinner - I had defrosted nothing and was really not interested in cooking. But as usual I talked myself into cooking because with all the food we have in the fridge it would be ridiculous not to.

The always fail-safe meal; frittata, an Italian omelet. Here is where having a steady supply of eggs, cheese, milk and various vegetables comes in handy. I scrounged in the freezer for sausage (I try to keep a stash of chicken apple sausage or breakfast links handy) and found some. I defrosted them by heating two of them in a skillet with a bit of water and proceeded to review my options in the fridge. The beauty of a frittata is that you can use whatever vegetables you have handy; mushrooms, tomatoes, zucchini, broccoli, etc. The choice for this one would be some scallions, crimini mushrooms and zucchini.

Crack six eggs in a bowl; add about two tablespoons of milk, and a scant quarter cup of cheese (usually I use the Parmesan/reggiano mix but in this case I am out and only have a four cheese shredded mix). I slice the green part of a scallion and add to the bowl of eggs with a bit of salt and pepper and briskly whisk the whole thing. I then set this aside. I turn on my oven to broil so that is warm when I am ready to put the frittata in for the final browning.

Then I wash about 5-6 crimini mushrooms and one zucchini; I slice the mushrooms and cut the zucchini into mouth sized bites. I heat the omelet pan with a bit of olive oil. When the oil is to the point of smoking, I drop in the mushrooms and zucchini and saute it until it gets soft with a bit of browning on some surfaces. When it looks perfectly cooked to eat, I take it off the heat and add the browned mushrooms and zucchini to the egg mixture and mix it all. I take the pan I just used to cook the vegetables and add a tablespoon of olive oil and a bit over a tablespoon of butter. (Traditional recipes call for almost half a stick of butter but I think this is a bit excessive).

I return the pan to the burner but this time the heat is set low. When the butter is melted I add the egg mixture and with a spatula, I pull the cooked edges into the center of the pan. This is the technique used for omelet making, you do not want to scramble the mixture you just want to pull the cooked edges toward the center and let the uncooked egg drain to the edge. You repeat this process until most of your egg is firm and there is a bit of runniness on top. You then pop the pan under the broiler and let the top cook for just a few minutes. (Usually the time it takes you to add a sausage to each plate and tell everyone dinner is ready.)

This recipe makes four good sized slices. We served ours with sausage, toasted raisin bread and orange juice.

Tuesday, June 10, 2008

Sour Cherry Pie


Last week I went to Concord to visit a little farm. The farm is owned by the father of a good family friend and his hobby is growing fruit and vegetables. Roy, the farmer, had some extra heirloom tomato plants for anyone who wanted them so my mother and I made the trek to the East Bay to take some plants off his hands. (I hope to feature these as ingredients later in the summer. He gave me several plants; Black Prince, Ping Pong Pink, Super Fantastics and Green Zebra.)

However the big find of the day was the sour cherry tree bearing lots of bright, red translucent fruit. The fruit was tart but had a wonderful sharp cherry flavor. My mother and I picked four boxes of them. I only took one box for myself but when I pitted and cleaned them I had 13 full cups of berries. I decided to use mine for cherry pies and since each pie needs 4-5 cups of fruit I set up two bags with four cups of pitted cherries each and save 5 cups for a pie to make that night.

I used the recipe for pie and crust from my favorite cookbook; "How to Cook Everything" by Mark Bittman. (By the way he has also published "How To Cook Everything Vegetarian" which would have crust alternatives if you are vegan.) I make the recipe for the double crust (page 686):

  • 2 1/4 cups of flour
  • 1 teaspoon of salt
  • 2 teaspoons of sugar
  • 16 tablespoons of butter (cut into pieces)
  • 6 tablespoons of ice water
Combine flour, salt and sugar in the container of a food processor and pulse once or twice. Add the butter and process until the butter and flour are blended and the mixture looks like cornmeal - about 10 seconds.

Place the mixture in a bowl and sprinkle the water over it then use a spoon or spatula to gradually gather the dough into a ball. If it seems dry add more water a 1/2 tablespoon at a time. When you can make the mixture into a ball with your hands, remove it from the bowl and flatten slightly. Wrap in plastic wrap and freeze dough for 10 minutes (or refrigerate for 30 minutes); this will ease rolling. (Dough can be refrigerated for a day or two and frozen indefinitely if you want to make it ahead.)

I preheat the oven to 450 degrees. I have the 5 cups of pitted, sour cherries in a bowl and I add 1/2 cup of sugar and 1 1/2 tablespoons of cornstarch (an alternate ingredient is 2 tablespoons of tapioca). When the crust is chilled I carefully divide it into two and roll out the bottom crust. Then I add the cherries and dot with 2 tablespoons unsalted butter cut into small bits. Next I roll out the top crust and decide to get fancy by doing a lattice top crust. To do a lattice top, I find a dish that is larger than my pie plate, place it on top of the dough and cut a clean circle of dough. From that circle, I cut it into strips - a bit less than half and inch wide.

I put the longest strip in the middle of the pie and the next largest strip across the middle of the pie perpendicular to the first. I keep alternating the strips and "weaving" the dough so that it alternates under and over. When I am satisfied that the top is nicely done I roll the edges and flute the crust to decorate it. I use the technique of pinching the dough between the side of my forefinger and thumb. I think it give the crush a nice almost shell-like edge. Before placing it in the oven, I gently brush the whole top of the crust with mild and dust with a bit of sugar.

I place the pie on a cookie sheet (because fruit pies tend to bubble over and it is a whole lot easier to clean a cookie sheet versus and oven). If you don't do the lattice top you will want to cut 2-3 two inch vents in the top crust. Place the pie in the oven and bake for 10 minutes. Reduce the heat to 350 degrees and bake for another 40-50 minutes or until the pie is golden brown.

Interestingly, the cherries were more tart after they were baked - with sugar - than they were fresh. But it was a delicious pie and satisfying to make it from tree to table.

Welcome

Thanks so much for visiting our site. Please feel free to leave comments telling me what you like about the site or postings as well as any feedback that might make viewing easier for you.