Thursday, July 17, 2008

Plum Crazy


Summertime presents a bounty of fruit even within the urban confines of San Francisco. Danielle and I ventured over to my mother's place in the Marina District answering the call to help pick plums. We were more than happy to climb ladders, tree limbs and fences in search of ripe fruit in the upper reaches.

Danielle was definitely more fearless and got right into the thick of things; climbing barefooted and balancing on wobbly fences. The picture here is us reaching over into the neighbors yard for cherry plums. They are small, yellow/pink plums that are like nothing I ever tasted. My mother says that all the surrounding yards used to have those plum trees but when the houses got new owners and re-landscaped they ripped out the trees because the fruit was too messy. I can imagine how the neighborhood was long ago, filled with largely Italian families all harvesting fruit from the trees and making jelly.

You never know what kind of bounty you might have in your own yard if you just moved into a new place. Even if you aren't a gardener, check it out and you might re-discover what fruit is supposed to taste like. Most of what we buy in the stores is not tree ripened and ultimately tasteless. Just one or two generations ago, people used to grow and harvest their own varieties of fruit and vegetables. They canned and preserved what they couldn't eat to keep enjoying their crops through the winter months and to share with friends/family. I am going to try to plant one of those cherry plum trees myself from the pits. I don't care how messy they are too tasty to risk losing. Plus I know my family, friends and the birds will enjoy them if I can get them to grow.

Jam and jelly making isn't a lost art but fewer people I know are doing it. Until recently, Danielle was the only person my age that I knew who did it. I have since met one or two other women but it seems to be a tradition they got from their mothers or grandmothers. (I find it very daunting myself but it really isn't much more than boiling fruit in water, adding sugar, straining the juice then boiling again to the "jelly point.")

I prefer to bake with fresh fruit and I tend to freeze extra for the winter months. I have been eating many plums every day since I picked them but plan to make a plum dessert with more of my bounty. The following are two recipes for plum desserts;

**************************
  • 6 tablespoons white sugar, divided
  • 14 Italian prune plums, halved and pitted
  • 3 eggs
  • 1 1/3 cups milk
  • 2/3 cup all-purpose flour
  • 1 1/2 teaspoons grated lemon zest
  • 2 teaspoons vanilla
  • 1 pinch salt
  • 1/2 teaspoon ground cinnamon
  • 2 tablespoons confectioners' sugar
Preheat the oven to 375 degrees F (190 degrees C). Butter a 10 inch pie plate, and sprinkle 1 tablespoon of sugar over the bottom.

Arrange the plum halves, cut side down, so that they cover the entire bottom of the pie plate. Sprinkle 2 tablespoons of sugar over the top of the plums. In a blender, combine the remaining 3 tablespoons of sugar, eggs, milk, flour, lemon zest, cinnamon, vanilla, and salt. Process until smooth, about 2 minutes. Pour over the fruit in the pan.

Bake for 50 to 60 minutes in the preheated oven, or until firm and lightly browned. Let stand 5 minutes before slicing. Dust with confectioners' sugar before serving.

********************************

Plum Cobbler

Preheat to the oven to 425 degrees F.

FILLING

  • 7 cups of pitted plums, cut in quarters
  • 1 1/4 cups of sugar (usually plums are a bit tart but the ones I picked are very sweet so I will reduce this to 3/4 cup)
  • 2 tablespoons of lemon juice
  • 4 tablespoons of butter (1/2 stick)

Place the prepared plums in a 8-inch square baking pan and sprinkle with the sugar. Drizzle on the lemon juice and dot the plums with butter. Set aside to make the biscuit topping.

BISCUIT TOPPING

  • 1 cup of flour
  • 2 tablespoons of sugar
  • 1/4 teaspoon of salt
  • 2 teaspoons of baking powder
  • 4 tablespoons of butter (1/2 stick), chilled
  • 6 tablespoons of milk

Combine the dry ingredients in a large mixing bowl and stir them together using a fork. Cut the butter into bits, drop into the bowl and work it into the dry ingredients using your fingers, a pastry cutter or two knives. You want it to be a mixture of fairly even and fine crumbs. Slowly add the milk while stirring constantly with the fork.

There are two options for covering the cobbler. My preference is the spoon the biscuit dough over the top so you can see the fruit and juice bubble through. Then you can ignore the need of adding a separate glaze.

However, you can also completely cover the top. So if you prefer this second method, continue with the following steps; gather the dough together and place on a lightly floured surface. Knead 8 to 10 times, until dough it fairly smooth then roll or pat the dough into a shape that will cover your baking dish. Place the dough over the prepared fruit, pressing it down around the edges. For a glazed crust, drizzle 2 tablespoons of melted butter over the top and sprinkle 1 or 2 tablespoons of sugar over that.

Bake the cobbler for 35 to 45 minutes or until the juices are bubbling, the crust is golden brown and the fruit is tender. Remove from the oven and place on a rack. Serve warm or room temperate.

*************************

Happy harvesting!

Wednesday, July 16, 2008

Cannelloni with Crepes


Many are familiar with cannelloni being made using pasta but there is a whole contingent that feel superb cannelloni is made with crepes. I like both ways but the crepe seems to deliver a more delicate dish. If you are making this for a party, I strongly suggest doing it at least a day ahead and even in stages. There are a whole lot of parts to make but taking the time makes for an amazing presentation and truly satisfying meal.

Crepe batter is best when it is given the good part of the day to sit; the flour has more time to absorb the liquid. Using a large blender (or split the recipe and do it in batches): measure 2 cup of milk, 2/3 cup of water into it then add four large eggs, 2 cup of all-purpose flour, 1/2 teaspoon of salt and 4 tablespoons of melted butter. Once all the ingredients are in the blender, I put the lid on the jar, put it on the base and blend until smooth for about 5 seconds. I put the blender jar directly in the refrigerator and leave it there until I am ready to cook the crepes. (At the very least the batter should sit for an hour; two is preferable. It can last for up to 24 hours.)

*************
MAKING CREPES
Ideally, you do need a crepe pan since you can more easily judge the size and thinness of the crepe with it. I try to avoid buying kitchen gear that serves only one purpose but in this case I find it necessary. To set yourself up, have a cooling rack (such as you would use for cookies) handy in which to place the crepes once cooked.

You want to have your pan on a burner set to medium-high heat. You will need a paper towel lightly coated with butter (you can use any type of oil but butter is preferable to achieve the right browning); you will brush this lightly over the surface of the pan so that the metal is shiny but you don't want any sizzling butter or oil. Pick the pan up off of the burner and pour 2-3 tablespoons of batter for a (6 or 7 inch pan; 1/4 cup for a 9 or 10 inch pan) on the pan while tilting and rotating to spread the batter to the edges of the pan - coating the pan's surface.

Cook until almost dry on top and lightly browned on the edges; about a minute. Loosen the edges of the crepe from the pan with a spatula and then flip the crepe over and cook for another 15 seconds or so. Turn the crepe onto the cooling rack and continue the process until all the batter is used; continue stacking the crepes. This recipe should make about 16 or 20-6 inch crepes.

*************
MAKING THE MEAT SAUCE
Heat a 1/4 cup of olive oil in a saucepan and add 2 tablespoons of finely chopped onion. Saute until golden; add 12 ounces of lean ground beef and turn the burner down to medium low. Cook the meat without browning. Crumble the meat as it cooks using a fork. When it loses its red raw color, cook it for one more minute without letting it brown. Add 2 teaspoon of salt and 1 cup of chopped canned tomatoes with their juice. Cook at the barest simmer for 45 minutes.

*************
MAKING THE FILLING
Heat a 1/4 cup of olive oil in a saucepan and add 3 tablespoons of finely chopped onion. Saute until golden; add 12 ounces of lean ground beef and turn the burner down to medium low. Cook the meat as you did above - without browning. Transfer the meat to a fine mesh colander and let the fat drain away.

When it is drained, place in a medium-sized bowl and add the following ingredients:
  • 3 teaspoons of salt
  • 1 cup of mortadella (Italian bologna) or unsmoked ham
  • 2 egg yolks
  • 1 teaspoon nutmeg
  • 3 cups Parmesan cheese
  • 2 1/2 cups of ricotta cheese

Mix all the ingredients thoroughly, taste and correct salt if necessary. Set aside for when it comes time to assemble.

*************
MAKING THE BECHAMEL SAUCE

Heat 4 cups of milk until it comes to the edge of a boil. Meanwhile, in a large enameled saucepan, heat a stick of butter (8 tablespoons). When the butter is melted add 6 tablespoons of flour and stir constantly. Let the flour and butter bubble for 2 minutes but do not let it color/brown.

Turn off the burner and remove the skin from the top of the hot milk. Using a whisk or wooden spoon stir the flour mixture constantly while adding 2 tablespoons of milk at a time. Before adding more milk, make sure that what you added is incorporated into the mixture. After you have done this four times (added the equivalent of 1/2 cup of milk) you can start adding 1/4 cup of milk at a time.

When all the milk has been incorporated, turn the burner on again to low, add 1/2 teaspoon of salt and, while stirring constantly, cook until the sauce is as dense as thick cream.

********
ASSEMBLY & COOKING
Preheat the oven to 400 degrees. Take a bake and serve pan 9x14 inches and butter the bottom.

Take a crepe and place about 2-3 tablespoons of filling down the middle then roll into a "flute." Place this into the prepared pan and repeat the process until you have filled all the crepes and/or finished the batter. Squeeze the cannelloni in tightly but do not stack.

Spread the meat sauce over the cannelloni, coating evenly. Spread the bechamel sauce over this. Sprinkle with 2/3 cups of Parmesan cheese and dot with about 1/4 cup of butter. Bake on the next highest rack in the oven for approximately 15 minutes, or until a light brown crust forms on the top. (Do not cook more than 20 minutes regardless.)

Allow to settle for 10 to 15 minutes before serving. The cannelloni is a very rich dish so goes well with a nice green salad or bruschetta mix (without the bread).

Thursday, July 10, 2008

Lamb Tenders and Supposedly Spoon Bread


I have been craving spoonbread, which is a dish my mother occasionally made when I was a kid. I loved it and couldn't get enough of it but have never attempted it myself. It is a slightly custardy, cornmeal side-dish; a cross between pudding and bread. I have never attempted this recipe myself but I decide to try. However, I found the recipe to be too complex so I looked for a variation that is less time consuming. The results were good but not what I was looking for so I will have to suck it up and be patient next time.

I have defrosted lamb tenders (1 to 1 1/2 pounds) and decide to marinate and broil them. My marinade consists of about 3 tablespoons of olive oil; two cloves of rough chopped garlic; 1 sprig of fresh rosemary, also rough chopped; pinch of salt and pepper; and 2 tablespoons of red wine. I set this aside while I move on to assemble my side dishes.

I set the over on to 375 degrees and collect my ingredients. I place 4 tablespoons of butter (half a stick) into a round deep casserole baking dish and set it on the stove over medium heat for about two minutes taking care not to burn the butter. turn off the heat and let it stand there. You can also use a cast iron skillet for this recipe. Next, I place all my dry ingredients in a large bowl: 1 1/2 cups cornmeal; 1/2 cup of all-purpose flour; 1/2 teaspoons of baking powder; 1 teaspoon of salt; and 1/4 cup of sugar. Next in a separate bowl, I combine 2 eggs yolks (set the whites aside for the last step) with 1 1/4 cup of milk (you can substitute buttermilk or yogurt here). I stir the wet ingredients into the dry ingredients and combine until smooth. Then I beat the two egg whites until stiff but not dry. I gently fold them into the batter until smooth then place the finished batter into the baking dish and put it in the oven to bake for 45 minutes.

I decide to not cook the lamb until the bread is finished because the meat will need to broil no more than 5 minutes per side. While I am waiting I periodically move the lamb around in the marinade to coat it evenly. When it is time to cook it, I set the broiler to Hi and place the lamb tenders on a broiler pan on the uppermost rack. I remove from the oven when each side has cooked for approximately 4-5 minutes and let stand.

To offset the baked bread and cooked meat, I decide to serve a cherry tomato salad on the side. I cut about 10 cherry tomatoes in half and toss them with a bit of olive oil, balsamic vinegar, salt and pepper. I slice the lamb tenders into bite-sized pieces, spoon a portion of the corn bread and a serving of tomatoes.

The bread is light and fluffy but there is no sign of a pudding texture. It is tasty and I am only disappointed because I really am still craving spoonbread.

Marinate After You Cook?


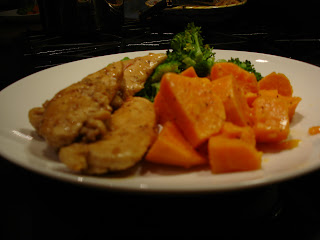
I cook chicken a whole lot but really it is so versatile it is hard to get sick of. I had defrosted some breast tenders and decided to look for a new way to cook them in How to Cook Everything by Mark Bittman.

I found a recipe that you can grill or broil chicken cutlets but the thing that caught my eye is that you marinate the chicken after cooking so I decided to try it.

I set the broiler to Hi then rinse and pat dry my chicken tenders (about 1 to 1 1/2 pounds or equivalent of two breasts). I rub the tenders with 1 tablespoon of vegetable or peanut oil and the cut side of a 1 clove of garlic then season them with salt and pepper. I place them on a cookie sheet and place on the top rack of the broiler and grill for 2-3 minutes per side. (If you have thicker pieces I would broil for 3-4 min per side. I hate dry chicken so I prefer to cook it for less time as I know it will continue to cook in the post-marinade.)

While the chicken is broiling I assemble the marinade. In a saucepan, I place the following ingredients: 1/2 cup of rice vinegar; 1 tablespoon honey; 1 tablespoon of water; 2 tablespoons of soy sauce; 1 tablespoon peeled and minced ginger (I was out and substituted just a mere teaspoon of dry); and 1 tablespoon of prepared horseradish. I simmer the ingredients over medium-low heat for about two minutes. When the chicken is cooked, I place it on a serving platter and cover it with the marinade. Then I let this sit there while I prepare the rest of the meal. You can serve right away if you prefer.

My side dishes will be boiled sweet potatoes and steamed broccoli. I prefer to keep things simple with the vegetables to not add extra calories or prep time. I simply peel and cut three medium-sized sweet potatoes, cover with water and boil until a fork can easily pierce a chunk or two. I then toss with a bit of butter and salt and pepper but this is optional. For the broccoli, I simply place about two cups of cut up broccoli into a steamer and steam until just soft. I strongly dislike mushy broccoli so I really keep an eye on it and drain the water immediately to stop it from cooking.

While the vegetables are cooking, I periodically move the chicken around in the marinade to coat it evenly. When the vegetables are cooked I simply serve them with the chicken at room temperature.

Tuesday, July 1, 2008

My Idea of a Pre-Packaged Dinner

I may have forgotten to defrost something for dinner but fortunately I have back-up meals that can quickly be thrown together. Tonight it is carnitas that I purchased pre-cooked from Trader Joe's. They are frozen but easily defrosted in the microwave. I remove the carnitas from the packaging, place in a microwave safe bowl and set the timer for 2 min increments.

On top of that I picked up a can of whole organic pinto beans during my last shopping trip so I open those and throw them into a saucepan to heat up. Luis is a bean purist so he prefers I leave them plain. However, adding a crushed clove of garlic enhances the flavor a bit.

My first plan was to make some fresh guacamole since I had a large avocado, some tomatoes and cilantro. Unfortunately, when I cut open the avocado I find it is has gone bad so I have to change my plan and make a fresh tomato salsa. This salsa has to be made quickly since my meat is already warmed up and Luis is making the quesadillas as I set everything up. I core two tomatoes and slice each into eight wedges. I remove some of the seeds as I go but don't get too picky about it. I mince some onion (about 1/4 cup worth) and add the juice of 1/2 of a lemon. (Lime would be preferable but I am making due with what I have.)

As I look for the cilantro to finish it off I realize that I threw it out two days ago. Fortunately, I purchase frozen herbs as a backup. Many grocery stores sell little flats (4x3 inches) of cubed servings of frozen herbs and garlic. I keep basil, cilantro and garlic in the freezer in case I happen to have a recipe that calls for them and I have either run out or not had time to buy fresh herbs in advance. I throw three cubes of cilantro into the salsa and add a pinch of salt.

While I have been setting everything up, Luis was making quesadillas on the comal. He briefly heated each corn tortilla on the comal, add a bit of shredded monterey jack (about 2 tablespoons per tortilla), folded and placed back onto the comal to heat them each enough to melt the cheese. (If you don't have a comal you can us a skillet for this. A pan typical to what you would use for a grilled cheese sandwich but don't add any oil.) You want to time them so that they come off the comal as you are serving your food since they get cold really easily.

Broiled Pesto Chicken

This is a quick and very tasty way to cook boneless chicken breasts in the broiler. I typically keep a stash of frozen pesto in my freezer and the brand I use is Armanino as it reminds me of homemade pesto.

This whole meal won't take more than 20 minutes or so. First turn the broiler to high and line a cookie sheet with tinfoil. Next place your chicken breasts in a plastic bad and give them a few whacks with a meat tenderizer. This will flatten the breasts out and allow for more even cooking. Place the breasts on the cookie sheet, apply pesto to the tops of each and place in the broiler. (When you flip the breasts you will add more pesto to the other side.)

You can make any type of side to go with this; mashed potatoes, boiled potatoes, pasta salad. In the picture, I chose to use a pasta grain blend that I find locally. It has quinoa, couscous, orzo pasta and lentils that cook up in about 10 minutes.

After I put on the pasta grain blend to boil and set the timer for 10 minutes, I check the breasts to see how they are coming along. It has been about 5 minutes so I take the sheet out of the oven, turn over the breasts and coat the other side with pesto. I then pop the cookie sheet back in the oven and let cook for an additional 3-5 minutes. [Depending on the temperate of your broiler you may need a bit less or even more time. It is important to not overcook the breasts to avoid having them dry and stringy.]

When the breasts are done and the side it cooked have everyone serve themselves. We decided to forgo the vegetables this evening but you can make a salad as a side to this for your greens.

Welcome

Thanks so much for visiting our site. Please feel free to leave comments telling me what you like about the site or postings as well as any feedback that might make viewing easier for you.